 Save
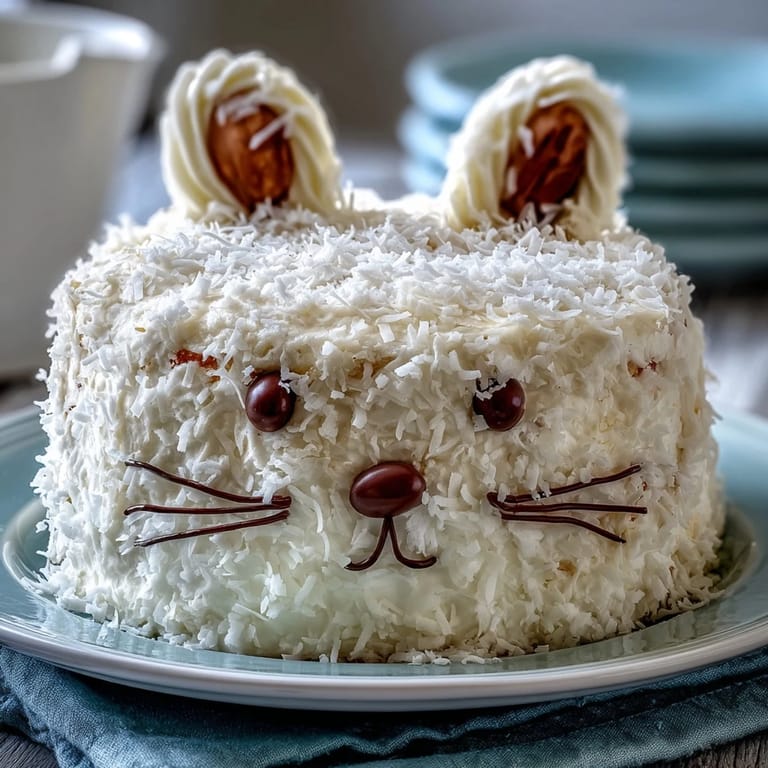
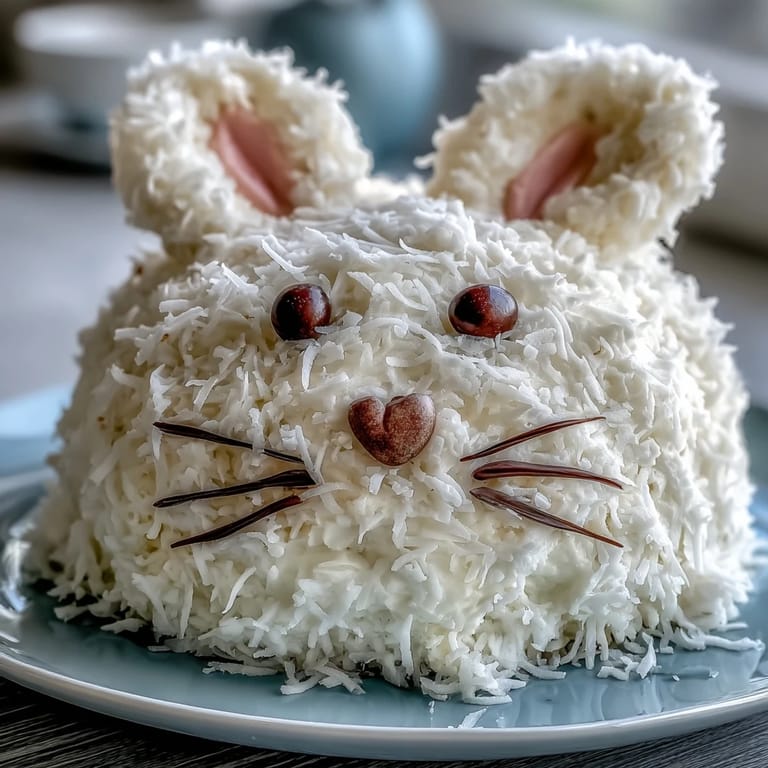
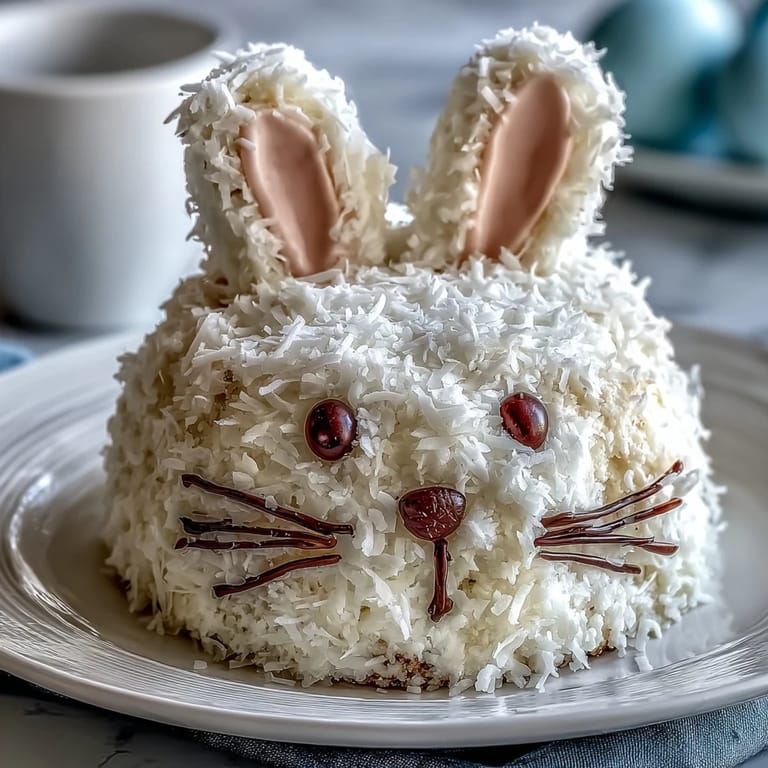
Save My daughter once demanded we make a cake shaped like a bunny, and I'll admit my first instinct was to panic. How do you even cut a cake into bunny ears without it looking like a lopsided accident? But then I realized that imperfection was the whole charm—this Easter Bunny Cake became our annual tradition precisely because it looked homemade and a little bit quirky. The fluffy coconut frosting and soft vanilla layers made it not just adorable but genuinely delicious, something the whole family fought over long after the Easter baskets were forgotten.
I made this cake for a spring brunch once, and watching grown adults light up when they saw the bunny sit down on the table—that moment felt like pure magic. One guest actually gasped, and another asked if they should photograph it before cutting into it, which I took as the highest compliment. It became the story of that afternoon, more memorable than any formal plated dessert could ever be.
Ingredients
- All-purpose flour: The foundation of a tender crumb, and measuring it correctly (spoon and level, never scoop) makes all the difference between a dense cake and one that melts on your tongue.
- Baking powder: Make sure yours is fresh and hasn't been sitting in the cupboard for years, as stale baking powder won't give you the lift you need.
- Unsalted butter: Softened room temperature butter creams properly with sugar to trap air, which is the secret to a fluffy cake.
- Granulated sugar: This feeds the yeast-like action in your batter and creates structure; don't skip the proper mixing time of about three minutes.
- Eggs: Always at room temperature, as cold eggs resist combining smoothly and can create lumps in your batter.
- Pure vanilla extract: The real stuff tastes infinitely better than imitation and makes this cake sing.
- Whole milk: The fat content keeps the cake moist and tender, so don't swap it for skim.
- Powdered sugar: Sifting it before using prevents lumps in your frosting and gives you that silky texture.
- Sweetened shredded coconut: This creates that signature fluffy texture on the outside, and it toasts slightly as it sits against the frosting.
- Pink food coloring: A few drops go a long way, so add gradually to avoid an overly bright bunny.
- Jelly beans or candy eggs: Look for ones with a shiny finish, as they catch the light beautifully when nested in the frosting.
- Licorice strings: These become the whiskers and add a playful, unmistakably bunny-like touch to the face.
- Mini marshmallows: They stick directly into the frosting without any adhesive needed, making decorating almost foolproof.
Tired of Takeout? 🥡
Get 10 meals you can make faster than delivery arrives. Seriously.
One email. No spam. Unsubscribe anytime.
Instructions
- Prepare your pans and preheat:
- Set your oven to 350°F and spend a moment properly greasing and flouring your round cake pans—grease the bottom and sides generously, then flour them and tap out the excess. This step prevents sticking and ensures your beautiful cake comes out cleanly.
- Mix your dry ingredients:
- Whisk flour, baking powder, and salt together in a bowl, and don't rush this part because evenly distributed baking powder means even rising. You'll notice the mixture becomes slightly lighter in color as you whisk, which means the ingredients are properly combined.
- Cream butter and sugar:
- Beat softened butter and sugar together for a full three minutes, watching as the mixture transforms from sandy and separated to pale, fluffy, and ribbon-like when you lift the beaters. This aeration is what makes your cake tender, so don't skip the time.
- Add eggs one at a time:
- Crack each egg into the bowl and beat well before adding the next one, allowing each to fully incorporate so you don't end up with a broken, curdled-looking batter. The final mixture should be smooth and creamy, almost like soft serve ice cream.
- Alternate flour and milk:
- Begin with the dry flour mixture, add some, then some milk, then more flour, ending with flour for the best texture. Stir gently after each addition, stopping as soon as no streaks of flour remain—overworking this is when cakes become tough.
- Divide and bake:
- Pour batter evenly between your prepared pans and smooth the tops so they bake at the same rate. The baking time of 30 to 35 minutes depends on your oven, so start checking at 28 minutes with a toothpick inserted in the center.
- Cool with patience:
- Let cakes rest in their pans for 10 minutes before turning them out onto a wire rack, as removing them too early will cause them to crack. Complete cooling is essential before assembly, so give them at least an hour at room temperature.
- Make your frosting:
- Beat softened butter until completely creamy, then gradually incorporate the sifted powdered sugar so it doesn't puff up and coat everything, alternating with milk and vanilla for a silky finish. The frosting should be spreadable but hold its shape when you stop beating.
- Tint the frosting:
- Set aside half a cup of white frosting in a separate bowl and add pink food coloring drop by drop, stirring between each addition so you achieve a soft, bunny-appropriate shade. Too much color at once can result in a neon bunny, which is fun but not what we're after here.
- Cut your bunny shape:
- Take one cooled cake round and use a serrated knife to carefully cut the top into two ear shapes, cutting away wedges on both sides to form the ears and a bow tie shape from the center or a leftover piece. This step requires a steady hand and maybe a small prayer, but the imperfections add character.
- Assemble on your board:
- Arrange the intact cake round for the face and position the two ear pieces above it, then place the bow tie below, using a small offset spatula or knife to help position everything. Step back and smile at how charming it already looks.
- Apply crumb coat:
- Spread a thin layer of white frosting over all the pieces to seal in crumbs, then refrigerate for 15 minutes so the final frosting layer adheres perfectly. This step prevents crumbs from mixing into your top layer and marring the appearance.
- Frost generously:
- Cover all the frosted surfaces with a thicker layer of white frosting, using bold, swooping strokes to create texture. Don't aim for perfection here; the coconut will cover any gaps.
- Add the coconut:
- Press shredded coconut onto all the frosted surfaces while the frosting is still soft, working in sections and patting gently so it adheres evenly. The coconut transforms the cake into a fluffy, adorable bunny that looks almost too precious to eat.
- Decorate the face:
- Use the pink frosting to fill in the inner ears and a little nose, then nestle jelly beans or candies for eyes, licorice strings for whiskers, and mini marshmallows for cheeks and a fluffy tail. Take your time here and step back frequently to admire your work.
 Save
Save There's something deeply satisfying about a cake that makes people smile before they even taste it, and this bunny does exactly that. Years later, I still get texts from friends asking if I'm making it for Easter, which tells me this cake has moved beyond being just dessert and become a cherished tradition.
Timing and Make-Ahead Strategy
The beauty of this cake is how well it cooperates with a busy schedule. You can bake the cake layers a full day ahead, wrap them tightly in plastic wrap, and store them at room temperature or in the fridge, which actually gives you time to plan your decoration strategy without stress. The frosting can also be made the morning of your event, and the assembly itself takes only about 20 minutes, meaning you can put this masterpiece together just hours before serving.
Flavor Variations and Personal Touches
While the vanilla and coconut combination is perfect as written, I've experimented with variations that surprised me in the best way. Toasting the shredded coconut in a dry skillet for a few minutes before pressing it onto the frosting adds a deeper, almost caramel-like flavor that elevates the whole cake, though it's a step worth taking only if you have time. A friend once substituted the white frosting with cream cheese frosting for tanginess, and it completely changed the character of the cake in a way that felt sophisticated and delicious.
Decorating Like a Pro Without Being One
The secret to making this cake look bakery-quality is not talent but rather allowing yourself to embrace the handmade aesthetic. Don't stress about perfect frosting lines; the coconut hides everything anyway, and children's eyes light up at homemade charm far more than clinical perfection. Here are the details that make the biggest visual impact:
- Place the jelly bean eyes asymmetrically rather than perfectly centered, which makes the bunny look friendlier and less robotic.
- Arrange the licorice whiskers in varying lengths for a natural, playful look rather than measured, uniform lines.
- Use the brightest white mini marshmallows for cheeks and tail, as their contrast against the coconut creates dimension and visual interest.
 Save
Save This cake has taught me that sometimes the most memorable desserts are the ones that spark joy the moment they hit the table, before anyone even tastes a bite. Make this bunny with your whole heart, and I promise it becomes the cake everyone asks for.
Recipe Questions & Answers
- → What kind of coconut is used in the frosting?
Sweetened shredded coconut is pressed over the frosting for a fluffy and textured finish.
- → How is the bunny shape created?
The cake layers are cut and arranged with a round base, two ear shapes on top, and a bow tie piece below, using a serrated knife for precision.
- → Can the cake layers be prepared ahead of time?
Yes, cake layers can be baked a day ahead and stored tightly wrapped to preserve freshness.
- → What decorations are used for the bunny’s face?
Jelly beans or candy-coated chocolates for eyes, licorice strings for whiskers, mini marshmallows for cheeks and tail, and pink-tinted frosting for ears and nose.
- → Are there alternative frosting options suggested?
Toasted coconut can replace sweetened shredded coconut for extra flavor, or cream cheese frosting may be used for a tangy twist.
- → What tools are recommended for assembly?
Two 9-inch cake pans, electric mixer, spatula, serrated knife for shaping, offset spatula for frosting, and a large platter for assembly.