 Save
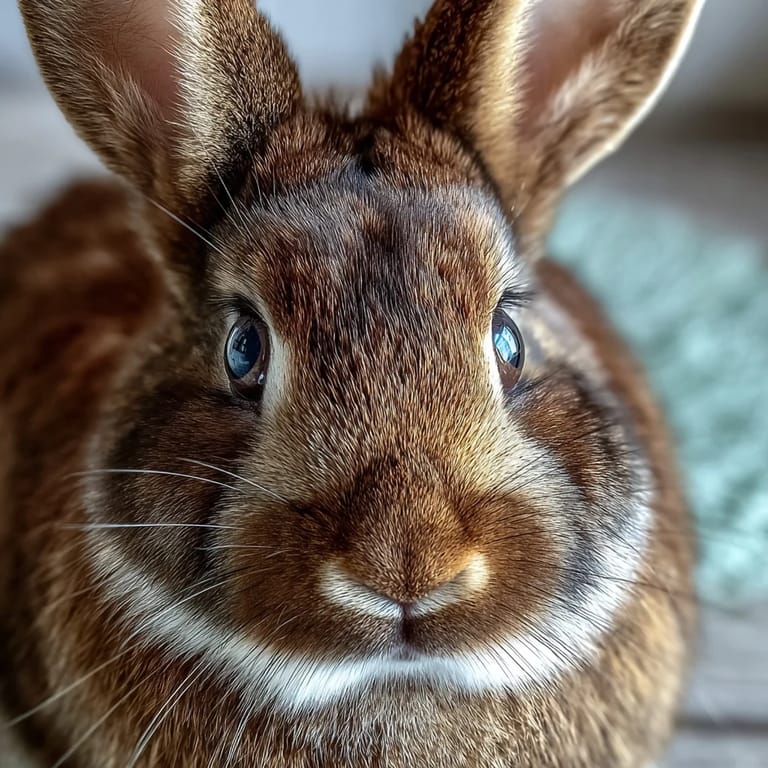
Save My daughter came home from school clutching a hand-drawn Easter bunny, insisting we make a cake that looked exactly like it. I stood in the kitchen that Saturday morning, flour dusting my sleeves, wondering how on earth I'd transform two simple cake rounds into something recognizable. Three hours later, when she saw that sparkly golden bunny sitting on our dining table, her face lit up in a way that made every wobbly ear and hastily-piped whisker worth it. That's when I realized this cake isn't really about perfection—it's about creating a moment.
I'll never forget my neighbor peeking over the fence as I was arranging the ears, asking if I'd bought it from a bakery. When I told her I'd made it at home, she got that look—the one that says someone just realized they might be capable of more than they thought. She made one for her grandson's party two weeks later and texted me a photo of him absolutely delighted. Food has this quiet power to inspire people.
Ingredients
- All-purpose flour (2 ½ cups): This is your cake's foundation, and weighing it makes a real difference in consistency—I learned that the hard way after a few dense batches.
- Baking powder (2 ½ tsp): Don't skip the measuring; this is what gives the cake that tender crumb everyone expects.
- Unsalted butter (1 cup for cake, 1 cup for frosting): Softening it at room temperature takes patience but pays off in a lighter, fluffier result.
- Granulated sugar (2 cups): This sweetens the cake and helps create that fluffy texture when creamed with butter.
- Eggs (4 large, room temperature): Cold eggs won't incorporate smoothly, so pull them out while you're measuring other ingredients.
- Pure vanilla extract (1 tbsp cake, 1 tbsp frosting): Vanilla is quiet but essential; it makes everything taste more like itself.
- Whole milk (1 cup): The moisture that keeps this cake tender long after it cools.
- Powdered sugar (4 cups, sifted): Sifting removes lumps and makes frosting smooth enough to pipe if you want to fancy it up.
- Shredded coconut (1 cup): This creates the bunny's fluffy fur and hides any frosting imperfections beautifully.
- Pink gel food coloring: Gel works better than liquid here because it doesn't thin out your frosting or coconut.
- Marshmallows (2 large, 2 mini): These become cheeks and teeth, giving the bunny personality and a touch of whimsy.
- Black licorice laces or gel icing: Either works for creating eyes and whiskers; licorice adds an actual textural element.
- Gold sprinkles: These are purely about the sparkle, but they transform the whole presentation into something celebratory.
Tired of Takeout? 🥡
Get 10 meals you can make faster than delivery arrives. Seriously.
One email. No spam. Unsubscribe anytime.
Instructions
- Heat and prepare:
- Preheat your oven to 350°F and take a moment to grease and flour those cake pans thoroughly—I use a pastry brush to get into the corners. This step feels small but it's the difference between a cake that releases cleanly and one that sticks.
- Combine the dry ingredients:
- Whisk your flour, baking powder, and salt together in a medium bowl until everything is evenly distributed. This prevents any pockets of baking powder from creating odd texture surprises.
- Cream butter and sugar:
- In a large bowl, beat softened butter and sugar together for about 3 to 4 minutes until the mixture looks pale and fluffy, almost like clouds. You'll know it's ready when it's noticeably lighter in color and feels airy when you lift the beaters.
- Add eggs one at a time:
- Beat well after each egg, waiting until each one is fully incorporated before adding the next—this ensures a stable, well-emulsified batter. Then stir in your vanilla extract.
- Alternate wet and dry:
- Add the flour mixture and milk alternately to your butter mixture, starting and ending with flour, mixing gently until just combined. This is not the time for overbeating; you want a smooth batter, not a tough cake.
- Bake the cakes:
- Divide the batter evenly between your prepared pans and bake for 30 to 35 minutes until a toothpick inserted in the center comes out clean. The kitchen will smell incredible, and that's your cue to start getting excited.
- Cool with patience:
- Let the cakes cool in their pans for 10 minutes, then carefully turn them out onto wire racks to cool completely. Rushing this step leads to frosting melting into cake, so I usually make coffee and wait.
- Make the buttercream:
- Beat softened butter until creamy, then gradually add your sifted powdered sugar along with milk, vanilla, and a pinch of salt, beating until fluffy and smooth. If it's too thick, add milk a teaspoon at a time; too thin, add a bit more powdered sugar.
- Assemble the bunny shape:
- Place one cake round as the bunny's face, then cut two ovals from the second cake for ears and use the remaining piece for a bowtie, arranging everything on a large serving platter to create your bunny form. This is where you get to play; there's no single right way to arrange it.
- Apply the crumb coat:
- Spread a thin layer of buttercream over the entire cake shape and chill for 20 minutes—this seals in crumbs so your final coat looks polished. It's an extra step but worth every minute.
- Frost generously:
- Apply a thick, even layer of buttercream over the chilled cake, using an offset spatula to create gentle waves and texture. This is your canvas.
- Add the fur texture:
- Press shredded coconut onto all the frosted areas while the frosting is still slightly tacky, giving your bunny that fluffy appearance. Work gently so you don't drag the frosting around.
- Tint and position pink details:
- Mix a small amount of coconut with pink food coloring for the inner ears and nose, then carefully arrange these pieces to bring the bunny to life. A tiny pinch of coloring goes a long way.
- Add the face:
- Position your marshmallows for cheeks and teeth, then use black licorice laces or gel to draw whiskers and eyes. This is the moment when your creation suddenly becomes a character.
- Finish with gold:
- Sprinkle gold sprinkles over the bunny for that celebratory sparkle, focusing on the ears and face for maximum shimmer. Step back and admire what you've created.
 Save
Save There was a moment, right after I'd placed the final gold sprinkle, when my son (who usually couldn't care less about what's for dessert) asked if we could take a photo to show his teacher. We did, and she actually shared it with the whole class. I realized then that sometimes the simplest act of creativity—shaping cake into a bunny, adding sprinkles—creates memories that stick longer than any perfectly executed technique ever could.
Making This Cake Your Own
The beauty of this cake is how forgiving and customizable it really is. You can make it chocolate by swapping out half a cup of flour for unsweetened cocoa powder, or use edible gold leaf for extra shimmer instead of sprinkles. I've seen versions with pastel-tinted coconut for different effects, and one memorable bunny whose ears were decorated with edible flowers. The structure stays the same, but the personality changes completely based on what's available in your kitchen or what excites you that day.
Storage and Make-Ahead Tips
You can actually bake the cakes a day ahead and keep them wrapped at room temperature, then frosting and decorate them the morning of your gathering. The finished cake keeps covered at room temperature for up to 2 days, or refrigerated for up to 5 days, though I've found it tastes best on day two when the flavors have had time to settle. If you're decorating ahead, add the gold sprinkles just before serving so they maintain their sparkle.
Serving and Celebration Ideas
This cake deserves a moment of its own, so present it before cutting into it—let people enjoy the whimsy for a beat. A glass of sweet sparkling wine or fresh lemonade pairs beautifully with the vanilla buttercream. I've found that serving smaller slices actually works better because the cake is rich, and it lets more people experience that joy of seeing it whole first.
- Cut slices with a warm, wet knife for cleaner edges and less crumb disruption.
- If any gold sprinkles fall off during serving, don't worry—they're edible and add a playful touch to each plate.
- Leftover cake tastes wonderful at room temperature or slightly chilled, depending on your preference.
 Save
Save This cake has taught me that sometimes the most meaningful things in the kitchen aren't about technical perfection or following rules precisely—they're about showing up with flour under your fingernails and creating something that makes someone smile. I hope your bunny brings exactly that kind of joy.
Recipe Questions & Answers
- → How is the bunny shape formed?
Two round cakes are used: one whole for the face, while the second is cut into ovals for ears and a bowtie, then assembled on a platter.
- → What ingredients create the fluffy frosting?
Softened unsalted butter is beaten with powdered sugar, milk, vanilla extract, and a pinch of salt until creamy and smooth.
- → How is the fur effect achieved on the cake?
Sweetened shredded coconut is pressed into the buttercream to mimic fluffy fur covering the bunny’s face and ears.
- → What decorations are used for the bunny's facial features?
Pink-tinted coconut marks the ears and nose, marshmallows create cheeks and teeth, and black licorice laces form whiskers and eyes.
- → Can the cake be stored, and for how long?
Store at room temperature covered for up to 2 days or refrigerated for up to 5 days to maintain freshness.