 Save
Save I still remember the Easter afternoon when my sister showed up at our family gathering with a platter shaped like a bunny—not a boring ham or roast, but an actual edible bunny made from colorful vegetables and creamy ingredients. Everyone stopped talking. Kids pointed. Adults leaned in closer. It was the kind of dish that made people smile before they even tasted it. That moment taught me that food isn't just about flavor; it's about joy, surprise, and the little magic you can create with your hands in twenty minutes.
The first time I made this for my nephew's birthday party, he gasped when he saw it. Not because he's easily impressed, but because something about the bunny's shape—those long ears, those little blueberry eyes—made it feel like a friend on the platter rather than just food. By the end of the party, hardly anything was left, and kids were asking me to make the bunny again next time. That's when I knew I'd found something special.
Ingredients
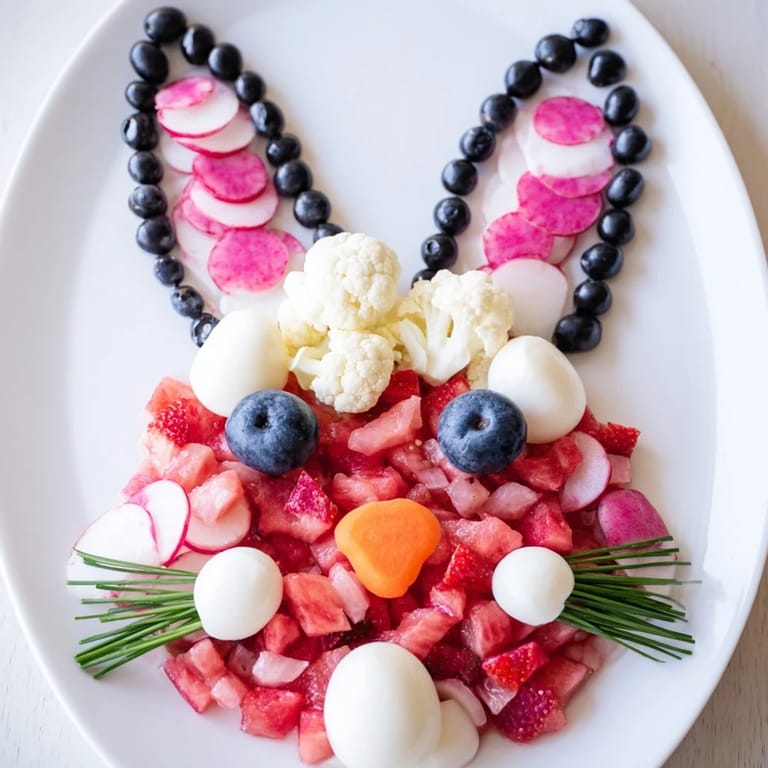
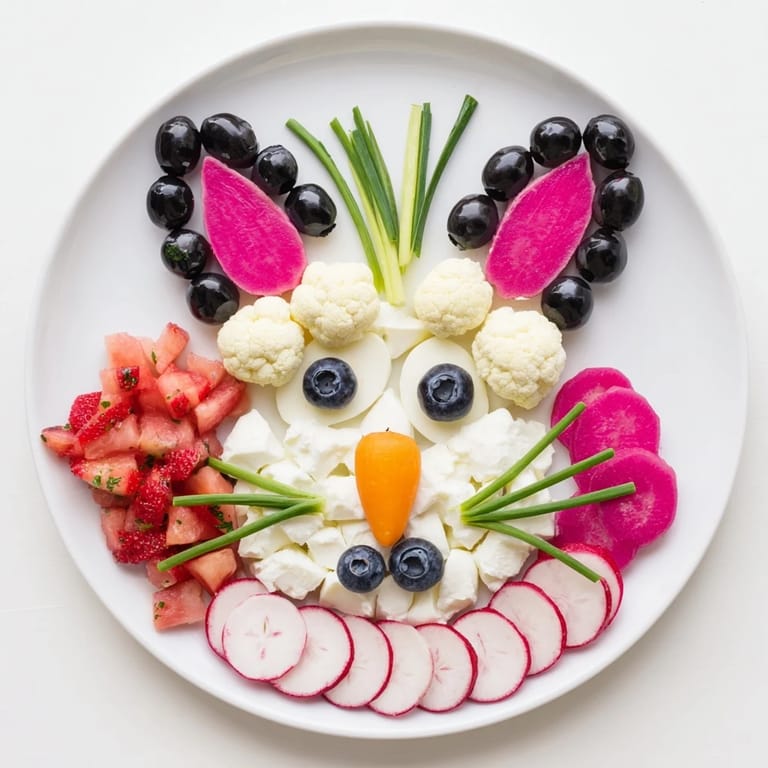
- Black olives: These create the outline that defines your bunny's entire face and ears—don't skip this step. I learned to use whole olives for a cleaner look, though sliced ones work if that's what you have.
- Strawberries and watermelon: The pink stars of this show. Dice them roughly the same size so they nestle together evenly and create that vibrant gradient in the ears. Fresh, ripe fruit makes all the difference in both color and taste.
- Pink beet hummus: This is your secret weapon for filling gaps and adding creaminess. If you can't find it, blend cooked beets with regular hummus—your bunny will thank you.
- Radish slices: These add a peppery crunch and help maintain that pink color family. Slice them thin so they look delicate and arrange them like little coins.
- Mini mozzarella balls: Creamy, mild, and perfect for the face. They roll into place naturally and look like tiny snowballs against the darker ingredients.
- Cottage cheese: Drain it well so it's not watery. This gives you texture and acts like edible glue, helping everything stay in place while looking soft and inviting.
- Hard-boiled eggs: Slice them thin to create white layers. They add protein and that familiar comfort that makes people feel welcome at the table.
- Cauliflower florets: Small, tender florets work best. They're mild enough not to compete and sturdy enough to hold their shape as you build.
- Blueberries, carrot piece, and fresh chives: These final details bring personality. The blueberries become eyes that seem to look right at you, the carrot is a cheerful nose, and the chives are whiskers that add movement and whimsy.
Tired of Takeout? 🥡
Get 10 meals you can make faster than delivery arrives. Seriously.
One email. No spam. Unsubscribe anytime.
Instructions
- Lay your foundation:
- Place your parchment paper or serving platter on a clean workspace where you won't need to move it. This is your canvas, and you want it stable from the start. Take a breath—you're about to become an artist.
- Map out your bunny:
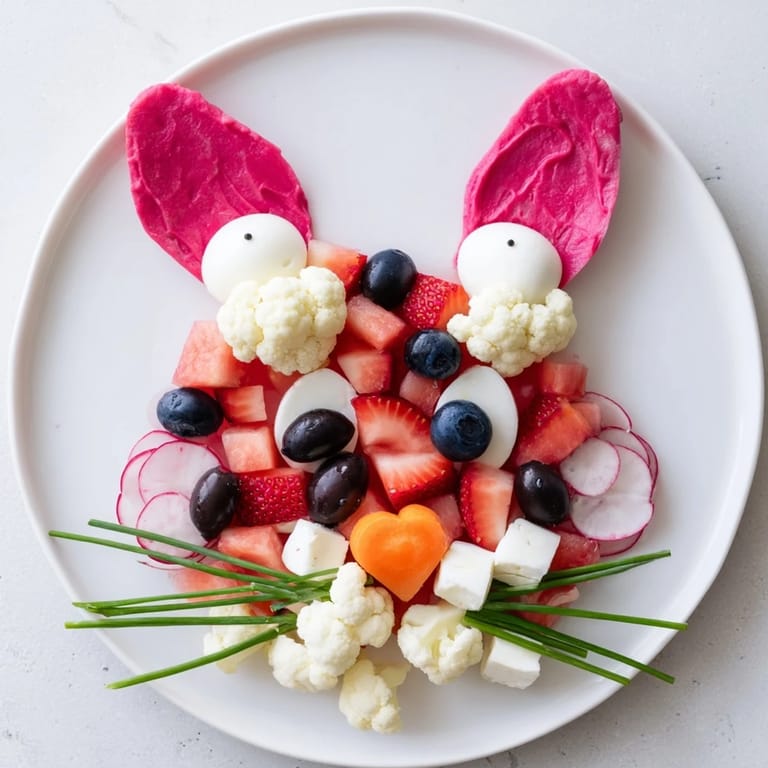
- Using black olives, draw a rabbit head shape in the center of your platter. Start with a large circle for the face, then add two long ovals extending upward for the ears. Don't worry about perfection; charming bunny shapes are imperfect ones. Step back and look at it from above. If it makes you smile, you're ready to fill it.
- Paint the ears pink:
- This is where color magic happens. Layer your strawberries, watermelon, radish slices, and beet hummus into the ear sections, alternating as you go. Think of it like creating a sunset—each ingredient is a band of color. Fill gaps with hummus so nothing looks empty. Stand back frequently to see how the colors are building.
- Fill the face with white:
- Now move to the bunny's face. Scatter mini mozzarella balls first—they're forgiving and roll into place easily. Then add spoonfuls of drained cottage cheese, overlapping slices of hard-boiled egg, and small cauliflower florets. Work slowly and arrange thoughtfully rather than just dumping ingredients. This is the bunny's personality showing through.
- Add the finishing touches:
- Place blueberries where the eyes should be—usually where two-thirds of the way up the face meet. Position a small carrot piece as the nose between and slightly below the eyes. Arrange chive strips like whiskers radiating from where the nose meets the face. These details take thirty seconds but transform the bunny from a platter into a character.
- Chill and serve:
- If you're making this ahead, refrigerate until guests arrive—the ingredients stay fresher and the presentation stays pristine. When it's time to serve, arrange crackers or vegetable sticks around the platter like a frame. Watch people's faces light up when they see it.
 Save
Save My favorite memory isn't actually from a party—it's from a quiet Sunday morning when I made this bunny just for my partner and me, with no occasion at all. We sat with coffee, broke off pieces slowly, and talked about nothing important. There was something about sharing a dish that smiled back at us that made an ordinary morning feel intentional and sweet. That's when I realized this recipe is about more than presentation; it's about creating moments worth remembering.
Creating Your Color Palette
The beauty of the Bunny Silhouette is that you're working with a natural color story—vibrant pinks and clean whites that feel fresh and spring-like. Pink beet hummus is your anchor ingredient here; it's what brings the pink family together and makes everything else look intentional rather than random. When I arrange the ears, I think of them like watercolor bleeding into each other, letting strawberries touch watermelon, radish next to hummus. The less rigid you are about keeping each ingredient totally separate, the more beautiful it becomes. If you don't have pink beet hummus, you can absolutely make it by blending cooked beets into regular hummus until you reach a soft, spreadable consistency. The key is that your pink ingredients should feel like they belong to the same color family—if you introduce orange or deep red, the whole composition feels off balance.
Timing and Preparation Strategy
This recipe lives or dies by preparation. The actual assembly takes ten minutes if everything is ready, but the chopping and slicing can stretch out longer if you're working without a system. Here's what changed everything for me: I prep everything in small bowls an hour before serving. This means when it's time to arrange, I'm not searching through my refrigerator for things, and my hands aren't wet and cold from constantly rinsing vegetables. Room temperature ingredients are easier to handle too—they're less likely to slip out of place as you layer them. If you're making this for an event and want zero stress, do all your prep the night before, cover each bowl with plastic wrap, and just assemble the next day. The platter actually looks fresher when you've taken time with it rather than rushed.
Customization and Seasonal Swaps
The skeleton of this recipe is the bunny shape and the pink-and-white color scheme, but inside that framework, you have tremendous freedom. In summer, I swap the strawberries for raspberries because they're more tart and they stain everything a deeper pink—it's dramatic and beautiful. In winter, I've used pomegranate seeds for the pink section and added pomegranate arils around the platter's edge. The white section is even more flexible: feta cheese crumbles, sliced mozzarella, ricotta, or even whipped goat cheese all work beautifully. For a dairy-free version, cashew cream mixed with lemon juice is creamy and neutral, and vegan cheese slices can replace the mozzarella. The nose can be a cherry tomato, a radish slice, or even a small piece of red pepper. Trust your instincts about what looks good and what tastes right to your palate.
- Try mixing fresh herbs like dill or mint into the white sections for unexpected flavor
- If you're serving this to kids, arrange ingredients in clearly separate sections so they can choose what to try
- Make extra chive whiskers and arrange a few loose ones around the platter—they add movement and liveliness to the overall presentation
 Save
Save The Bunny Silhouette is a reminder that the most meaningful meals don't require hours of cooking or complicated techniques—they require presence and a willingness to play. Make this for someone you love, and watch their face before they even taste it.
Recipe Questions & Answers
- → What ingredients create the pink effect?
Diced strawberries, watermelon, radish slices, and beet hummus combine to form the vibrant pink sections.
- → How is the bunny shape outlined?
Whole or sliced black olives form a clear outline of the bunny head and ears on the serving platter.
- → Can I substitute any ingredients for dietary needs?
Yes, vegan cheese alternatives can replace dairy, and you may swap pink fruits like strawberries with raspberries or pink grapefruit.
- → What textures are included in the white fillings?
The white areas feature mini mozzarella balls, cottage cheese, hard-boiled eggs, and cauliflower florets offering creamy and crisp textures.
- → How should this dish be served?
Chill the platter before serving. It pairs nicely with crackers or vegetable sticks and fresh spring beverages like sparkling rosé or elderflower lemonade.