Save
Save I'll never forget the St. Patrick's Day party where my niece insisted on helping me create something special for the dessert table. We were standing in the kitchen, flour still dusting my apron from the morning's baking, when she suggested we make something "lucky" that looked like nature itself. That's when the four-leaf clover snack was born—a playful, colorful creation that became our tradition. Now every year, when that holiday rolls around, I find myself in the kitchen again, remembering her excited face as we arranged those little pieces into perfect green clovers.
I remember bringing these to a potluck at work during March, and honestly, I was nervous about whether anyone would actually eat them or if they'd just sit there looking pretty. But within minutes, they disappeared, and three people asked for the recipe. That's when I realized this wasn't just a cute decoration—it was genuinely delicious and fun to eat. My coworker Sarah still texts me every spring asking if I'm making them again.
Ingredients
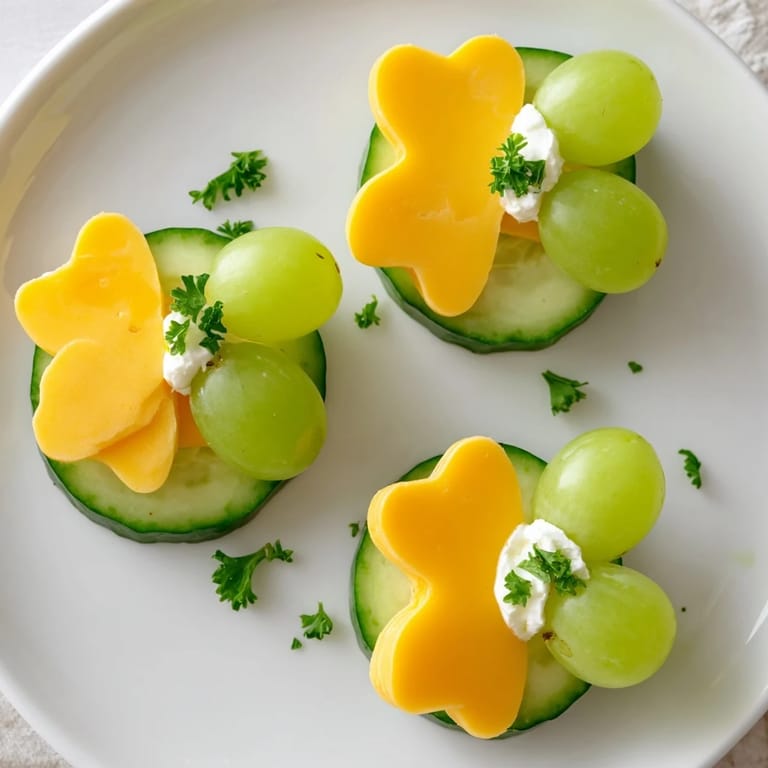
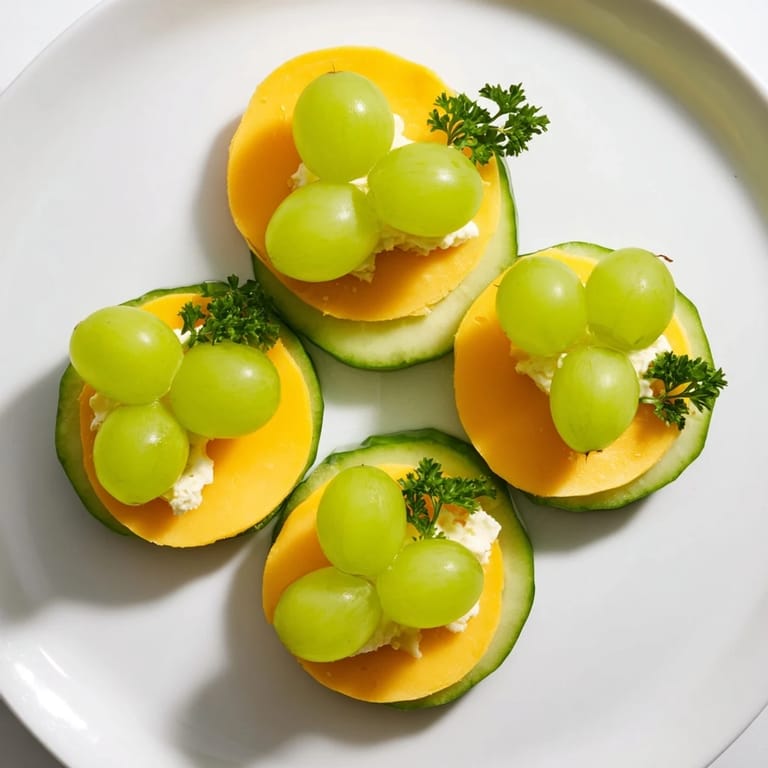
- Round cucumber slices (16 total, about 1/4-inch thick): These form the four leaves of your clover and provide a refreshingly crisp base. I've learned that slightly thicker slices hold up better without becoming soggy, and choosing a cucumber with a firm texture makes all the difference. Pat them dry with paper towels before assembling—moisture is your enemy here.
- Thin round cheddar cheese slices (16 total, cookie-cutter cut): The golden-orange color is what makes these snap into recognizable clover leaves. A small round cookie cutter makes this easier, though a knife works fine too. Room-temperature cheese adheres better and looks less fragile.
- Small green grapes or cherry tomatoes, halved (4 total): These become the heart of each clover, the lucky center piece. I prefer grapes for their sweetness, but cherry tomatoes add a surprise pop of tanginess that some people love even more.
- Celery sticks or pretzel rods (4 total, 3 inches long): The stem brings your clover to life and gives it something to hold onto. Celery is fresher and more delicate, while pretzel rods are sturdier and add a satisfying crunch if your guests bite into them.
- Cream cheese or hummus (2 tablespoons, optional): This acts as edible glue, helping all the pieces stay together on the plate or during transport. A tiny dot is all you need—less is always more.
- Fresh herbs like parsley or dill, finely chopped (optional garnish): A sprinkle of green brings the whole thing together visually and adds a fresh flavor note that makes people wonder what you did to make it taste so good.
Tired of Takeout? 🥡
Get 10 meals you can make faster than delivery arrives. Seriously.
One email. No spam. Unsubscribe anytime.
Instructions
- Gather and prep your canvas:
- Start by laying out all your ingredients on your cutting board like you're about to paint. Slice those cucumbers to an even 1/4-inch—not paper-thin, or they'll bend like sad leaves. Cut your cheese rounds to match the cucumber size, halve your grapes, and measure out those celery or pretzel stems. Having everything ready before you start arranging takes the stress out of the process and lets you focus on the fun part.
- Create the four-leaf base:
- On your serving plate, arrange four cucumber slices so they radiate from a center point, each one slightly overlapping its neighbor. Picture the way a real four-leaf clover spreads out from the stem—that's your guide. This is the moment where it starts looking intentional rather than random.
- Crown each leaf with cheese:
- Place one cheddar round on top of each cucumber slice. The cheese and cucumber combination creates visual depth, and that little bit of height makes the whole thing feel more elegant than it actually is.
- Plant the lucky center:
- Set your grape or tomato half right in the middle where all four leaves converge. This is your clover's secret—the moment it stops being random vegetables and becomes something magical. Step back and admire for a second; you've earned it.
- Add the stem with intention:
- Tuck your celery stick or pretzel rod underneath the clover so it looks like it's growing right out of the plate. If it won't stay put, a tiny dab of cream cheese under the stem keeps everything in place without looking messy.
- Seal the luck with garnish:
- If you're using the optional cream cheese or hummus, use it sparingly—just enough to make pieces stick if needed. Sprinkle your fresh herbs over the whole thing, focusing a bit more on the center so it looks intentional. This final touch is what makes guests think you spent hours when really, you've been working for maybe ten minutes.
- Repeat the magic:
- Build three more clovers the same way, and suddenly you have a whole lucky garden on your plate, ready to bring smiles and good wishes to your table.
 Save
Save What struck me most about making these wasn't just how fun they were to create, but how they brought people together. At my sister's bridal shower, three generations gathered around the snack table, and suddenly grandma was telling stories about St. Patrick's Days from her childhood while everyone nibbled on these little clovers. It reminded me that food isn't just about flavor—it's about creating moments where people feel welcome and cared for.
Making It Your Own
The beauty of this snack is that it's endlessly customizable depending on what you have in your kitchen and what your guests enjoy. If you're cooking for someone who loves protein, swap the cheese for thin turkey or ham rounds, and suddenly you have a heartier option that feels more substantial. For vegans, hummus or dairy-free cheese work beautifully. I've even made these with roasted red pepper rounds instead of cheese for a summery version that tastes completely different but maintains that same playful spirit.
Transport and Storage Tips
If you're taking these somewhere other than straight to your table, assembly timing matters. I've found that assembling them no more than 2 hours before serving keeps everything crisp and fresh-looking. If you must assemble earlier, keep them in an airtight container with paper towels to absorb any moisture. The cream cheese or hummus acts as a protective barrier, so don't skip it if you're transporting—it keeps everything from shifting around and looking sad when you arrive at your destination.
Why This Works for Almost Any Occasion
While this started as a St. Patrick's Day tradition in my kitchen, I've learned it works for so much more. Spring potlucks, garden parties, kids' lunchboxes, baby showers, or just a Tuesday when you want to add a little whimsy to your afternoon snack spread. It's vegetarian, naturally gluten-free if you choose celery over pretzels, and requires absolutely no special cooking skills. The magic isn't in technique—it's in the thoughtfulness of arranging simple ingredients into something that makes people smile before they even taste it.
- Choose cucumbers that feel firm and heavy, not light and watery—they hold their structure so much better.
- If grapes aren't available, cherry tomato halves or even small mozzarella balls work as charming center pieces.
- Make a few extra components in case you want to eat one while arranging—I always do, and it keeps the whole process feeling less precious and more fun.
 Save
Save Every time I make these little clovers, I'm reminded that the most memorable meals and moments don't come from complexity or fancy techniques—they come from showing up with intention and a little playfulness. These four-leaf clover snacks are proof that sometimes the simplest, most joyful things are the ones worth repeating year after year.
Recipe Questions & Answers
- → How do I assemble the clover snack?
Arrange four cucumber slices in a slightly overlapping clover shape, place cheddar cheese slices on top, add a halved grape or cherry tomato at the center, and finish with a celery stick or pretzel rod as the stem.
- → What can I use instead of pretzel rods?
Celery sticks make a great gluten-free alternative for the stem component, providing crunch and freshness.
- → How can I keep the pieces from falling apart?
A small amount of cream cheese or hummus can be used as a binder to secure the cucumber, cheese, and grape in place.
- → Can I substitute the cheddar cheese?
Yes, turkey or ham slices can be used for added protein or different flavor, tailored to preferences.
- → Are there any allergen concerns?
This snack contains dairy and may contain gluten if using pretzel rods. Grapes may also trigger allergies for some, so check accordingly.
- → How long does it take to prepare this snack?
Preparation takes about 15 minutes, with no cooking required, making it quick and simple for any occasion.